Obsidian 插件:Note Sync
插件名片
概述
该插件支持在多个 Obsidian 库之间同步笔记或插件,主要功能是实现跨库数据同步,解决用户在多设备或多场景下需要手动复制粘贴的痛点,适用于需要在不同库中保持笔记一致性或插件配置统一的场景,尤其适合团队协作或多设备办公的用户。通过自动化同步机制,该插件简化了数据迁移和备份流程,确保工作流无缝衔接。
功能介绍
导出笔记/Export Notes
同步文件或文件夹: To sync a file or folder:
-
在文件列表中,右键点击文件或文件夹; Right-click the file or folder in the file list;
-
点击
mirror to other vault; Clickmirror to other vault; -
输入目标库根目录; Enter the root directory of the target vault;
-
笔记、文件夹以及笔记嵌入的附件,会按相同的文件结构复制到目标库。如果目录库中存在同名文件,则根据更新时间判定是否覆盖;
Notes, folders, and embedded attachments will be copied to the target vault with the same structure. If a file with the same name exists, it will be overwritten only if the source is newer.
导出插件/Export Plugins
-
执行命令
Note Sync: export plugin; Run the commandNote Sync: export plugin; -
选择要导出的插件; Select the plugin you want to export;
-
选择是否导出
data.json; Choose whether to exportdata.json; -
输入插件保存目录; Enter the directory where the plugin will be saved;
-
输入回车键确认; Press Enter to confirm.
将笔记导出为 readMe / Export a Note as readMe
执行 `Note Sync:Set config to export note`,设置导出信息:
Run `Note Sync:Set config to export note` to configure the export settings:
Dir:导出路径 `Dir`: Export directoryName:文件名称,默认为 readMe `Name`: File name (default: readMe)Assets:附件存放路径 `Assets`: Path to save attachmentsRemoveMeta:是否移除元数据,默认为 true `RemoveMeta`: Whether to remove metadata (default: true)- UseGitLink:附件链接使用 Git 格式,默认 true
文件导出配置示例/Example Export Configuration
note-sync:
  Dir: D:\github\ObsidianZ-dev\.obsidian\plugins\note-sync
  Name: readMe_中文
  Assets: ./assets
  RemoveMeta: true
  UseGitLink: true
然后执行 `Note Sync:Export current note` 导出当前笔记。
Then run `Note Sync:Export current note` to export the current note.
下载示例库文件/Download Example Vault Files
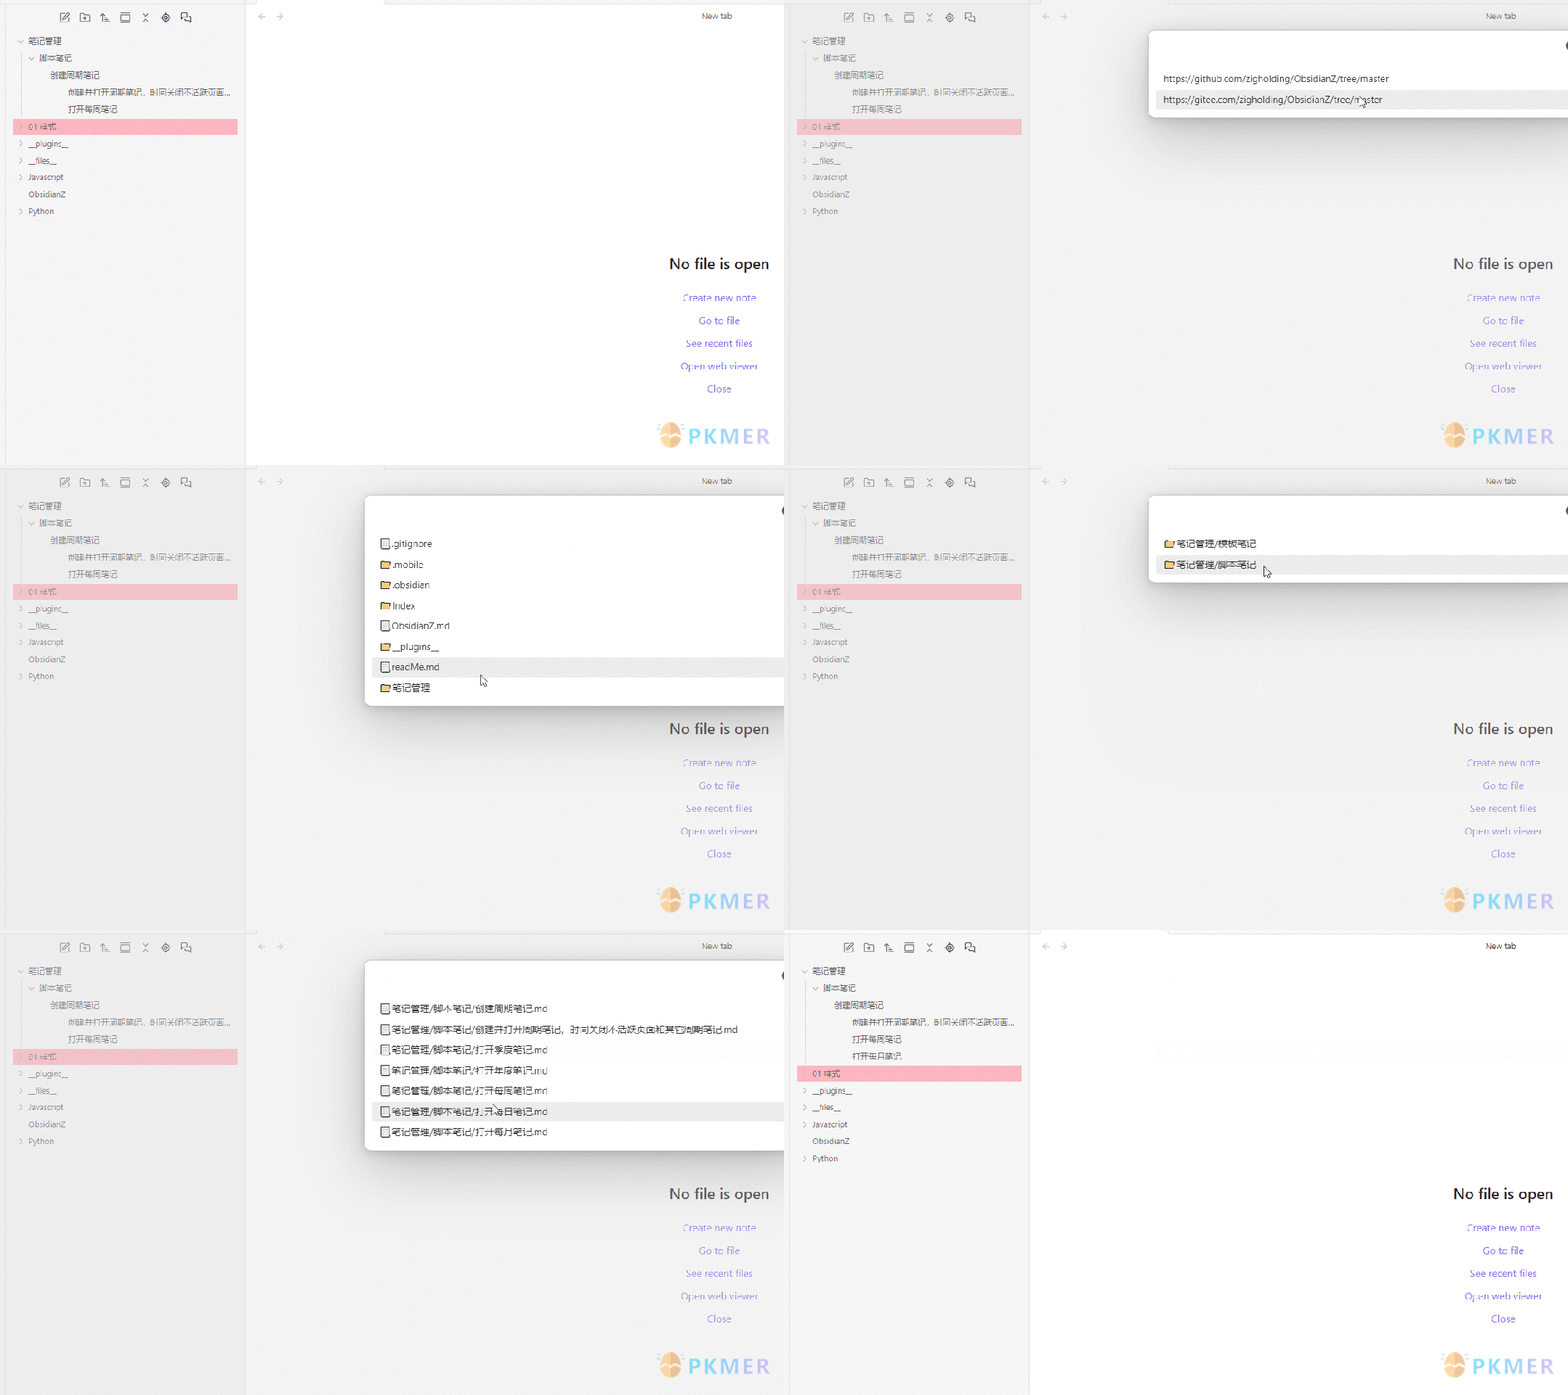
在 `设置` 页面配置 `Git 仓库`,需要包含分支名称:
Configure the `Git repository` in the Settings page. The URL must include the branch name:
https://github.com/zigholding/ObsidianZ/tree/master
https://gitee.com/zigholding/ObsidianZ/tree/master
执行 `下载 Git 仓库文件` 命令,依次选择仓库、文件夹和文件进行下载。输入 `all` 可下载所有文件(不包括子文件夹)。
Run `Download git repo`, select the repository, then choose folders and files to download. Enter `all` to download all top-level files (excluding subfolders).

下载文件时,也可以预设路径,快速下载: You can also preset the path for quick download when fetching files:
设置页/Settings Page

库目录/Root dir of vault
导出插件或同步文件时,选择预设的目标库。多个库请用换行符分隔。 Set predefined vaults for export/sync. Use newlines to separate multiple vaults.
严格模式/Strict mode
启用严格模式,在目标文件夹中删除源文件夹中不存在的笔记或附件。请谨慎操作,此设置会删除文件。 Enabling strict mode will delete notes or attachments in the target folder that are not present in the source. Use with caution—this option will delete files.
函数/Functions
`NoteSync` 提供了两个个函数用于同步文件和文件夹,可用于脚本笔记中。
`NoteSync` provides two functions to sync files and folders, which can be used in your script notes.
参数 `mode` 用于指定当目标库中已有文件时的处理方式:
The `mode` parameter determines how to handle existing files in the target vault:
pass:跳过 `pass`: Skipoverwrite:覆盖 `overwrite`: Overwrite- mtime:根据更新时间覆盖
let ns = app.plugins.plugins['note-sync']

// 同步系统文件夹
// Sync system folder
ns.fsEditor.sync_folder(
	src:string,
	dst:string,
	mode='mtime',
	strict=false
)

// 同步 Obsidian 笔记文件夹
// Sync Obsidian TFolder
ns.fsEditor.sync_tfolder(
	tfolder:TFolder,
	vault_root:string,
	mode='mtime',
	attachment=true,
	outlink=false,
	strict=false
)
插件做出来不难,但做到真正实用,并能被 Obsidian 官方收录、被更多人用上,是件很值得坚持的小事。
Note-Sync 是为了那些需要同步多个库、导出高质量笔记的人而生的。如果你也遇到这些需求,不妨试试看。
讨论
若阁下有独到的见解或新颖的想法,诚邀您在文章下方留言,与大家共同探讨。
反馈交流
其他渠道
版权声明
版权声明:所有 PKMer 文章如果需要转载,请附上原文出处链接。


